Last Updated on August 28, 2024 by Clark Omholt
You have three options for calibrating your monitor under the Windows 10 or 11 operating system. Ranging from basic to professional and from free to pricey, all the methods below can help you achieve a good color setup with slightly varied degrees of color accuracy.
We’ll begin with the free option built into the Windows OS.
How to Calibrate Your Monitor on Windows
Option 1: Color Management Control Panel
Price: free
Method Employed: guesstimating, aka relying on your eyes to guide the calibration process
Pros:
- native software
- easy to use
Cons:
- Performs an sRGB calibration. Not valid for wide gamut / professional displays.
- The method to find an ideal brightness is extremely crude and not of much value on most displays. The method for finding your preferred brightness is very basic, and doesn’t provide much of an improvement on most monitors.
- You can pick a target white point, but without any sort of measurement, it’s more of a guess.
Here are the steps to launch the Display Color Calibration utility using the Windows control panel:
- Open Control Panel – from the Windows Search Bar type in “Control Panel”. This will open your computer settings / control panels.
- Click on the “Color Management” control panel (alternatively, you can simply search for “Color Management”).
- Click the “Advanced” Tab
- Under Display Calibration, click “Calibrate display” – this will launch the Display Color Calibration (DCC) utility.
And here are the steps to using the DCC utility.
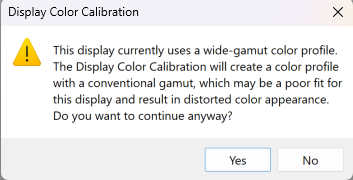
- Wide Gamut Warning – first, you should be aware that if you are using a higher quality, wide gamut display, the DCC was not designed to work with these. And it will likely produce poor results. If that is the case, you will receive this warning:
- Set Gamma – this uses a slider to adjust your gamma (which is related to contrast). It’s a pretty coarse control. It will help return your gamma to something reasonable if it’s really whacked. But in my experience, most displays have a reasonable gamma, so it’s probably best not to adjust the gamma slider.
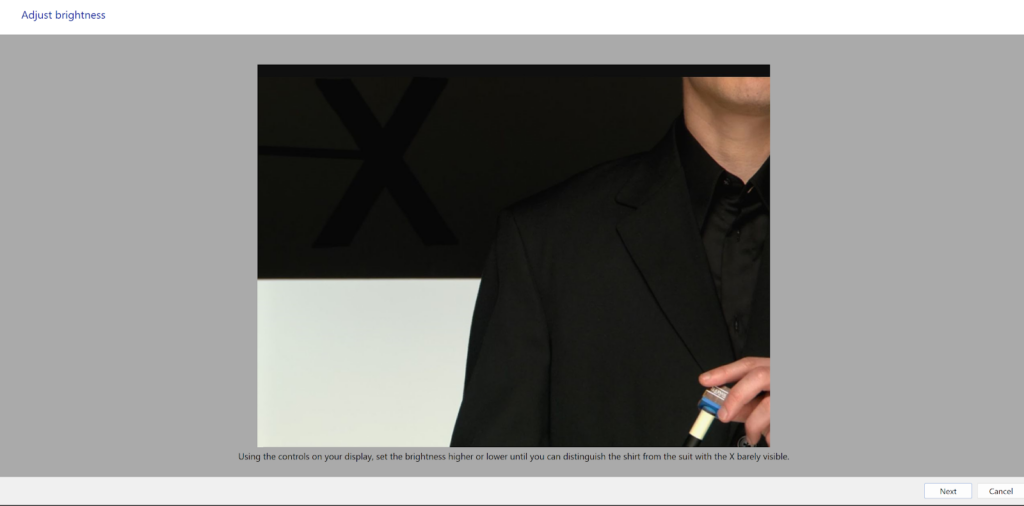
- Set Brightness – I find the brightness image itself to be a useful part of this utility. It helps you to visually optimize shadow detail for your viewing environment by adjusting brightness.
- Set Contrast – the intended purpose of set contrast adjustment is to preserve good highlight detail. In reality, this is a legacy feature from many years ago when the dominant display technology was CRT (cathode ray tube). I have calibrated many, many LCDs over the years and have never felt compelled to adjust the OSD (on-screen display) contrast. And in fact, many LCD screens do not have a contrast adjustment.
- Adjust Color Balance (White Point) – If your gray balance is really off, this might be useful in returning you to something reasonable. However, measurement-based calibration utilities will enable you to set a white point using degrees Kelvin (e.g., 6500K). In other words, this will enable you to go from “bad” to “OK” but not from “OK” to “spot on” like measurement-based calibration. And this second scenario is a much more common need.
- Save Calibration – Lastly, you are prompted to save either your previous calibration or stick with the previous one.
⚠️ HDR: It is worth noting that Windows also has a built in utility to optimize highlight and shadow detail in an HDR environment. This utility is reviewed in our Color Management for Windows article.
Summary: If your monitor is seriously “whacked,” with a significant cast to your gray or no shadow detail, this utility should be helpful. But if you are like most people, where you want to go from an unknown state to a known, calibrated state, you will want something a little more sophisticated.
Your next two options on this list will solve that issue and result in a calibrated profile.
Option 2: The TruHu App
Price: $39.99 / year
Method Employed: uses your phone’s camera to calculate colorimetric data points and generate an optimized color profile
Pros: simple, inexpensive, easy to use
The TruHu app is tailored for color professionals, offering a streamlined and high-performing calibration software. It surpasses the visual process provided by Windows OS while offering a more affordable and user-friendly alternative to colorimeter-based solutions.
Specifically, unlike the free option, TruHu offers a precise gamma and white point and also measures the monitor’s chromaticities to create a precise profile for accurate color communication.
Why? Beginner color professionals often find the limitations of the built-in Windows tool a real pain. Investing in a costly colorimeter can be daunting, especially with the added challenge of navigating complicated software. So, how exactly does it work?
Enter TruHu:
- Start by downloading the TruHu app on both your computer and mobile device.
- Once installed, create an account and sign in on both apps.
- You don’t need to subscribe right away—TruHu offers a Trial subscription that lets you test out the calibration process before committing. But you will need to subscribe if you want to save your color profile.
- Next, here are the steps in the mobile app:
- Adjust your ambient lighting to match your typical working conditions.
- Set your brightness to a comfortable level.
- Choose a target color temperature. A higher temperature results in a bluer white, while a lower temperature gives a more yellow hue. Most are fine with 6500K (Kelvin). There’s also the option to keep your current color temperature if you don’t know what the value is but you still enjoy it.
- Capture two photos of color swatches. Simply point your phone at the screen and capture an image of the Gray Target, followed by the Color Target. The app itself will have more details. At this stage, the app gathers colorimetric information from your phone’s camera sensor in its RAW state, allowing for measurement-based color accuracy.
- And you’re done! After completing these steps, your new color profile will be automatically generated and applied. The last screen of the desktop app allows you to pick between your old profile and the new one generated with TruHu.
- Set a reminder. Let the app know when you want to recalibrate. We recommend most professionals repeat this process once a month, or whenever the work environment changes dramatically.
TruHu takes only a few minutes to install and use, and then the app will remind you every so often to do it again, and that’s that. It’s easy. If you can use a computer and an iPhone, you can use TruHu.
You can also try it for free and see if you like it. You can’t use the profile the free version creates, but you can see how the app works and see if the results are worth it.
For many users, it’s the last calibration technology they’ll need.
– Jeremy Gray, PetaPixel Review of TruHu
If you’re still having difficulties figuring out how the TruHu app works, check out this video:
Option 3: Colorimeter-based Calibration
Price: $179-$320
Method Employed: colorimeter measurement
Pros:
- Sets brightness based upon luminance measurement
- Most packages allow validation
Cons:
- Pricey
- Difficult-to-use software
- Separate physical device
- Some require advanced knowledge of your monitor
Colorimeters, like Calibrite’s Colorchecker series or the Spyder models from Datacolor, have long been the standard tools for monitor calibration among color professionals. These devices usually start at around $179 for a current-gen model.
Their features and specs can vary widely depending on the brand and model. But generally, using a colorimeter involves measuring over 100 color patches, which can take more than 10 minutes for one calibration, and the initial one taking even more if you don’t know specific details about your monitors (like the type of backlight technology—something that isn’t always easy to figure out).
If you’re thinking the upfront cost seems like a good deal for a device that you can use for years, keep in mind the sensors in colorimeters don’t last forever. They typically need to be replaced every 3-4 years as they degrade over time. Also, the devices still need software for you to use them, and for some brands, devices lose software support after 3-5 years (which can be very frustrating).
Lastly, most colorimeters connect via USB-A, which can be a hassle for Mac users with only USB-C ports—meaning you’ll need an adapter that might fail over time. And since these gadgets are small and not used very often, they’re really easy to misplace.
Despite these quirks, if you’re willing to invest, a colorimeter can still be a solid choice for anyone who really wants to hyper-optimize their screen and determine if one area is performing more poorly than another in terms of color.
Summing Up
There you have it – we went over the three most common ways of calibrating your monitor for your Windows computer:
- A free option which suffers from the limitations of not using a measurement device
- TruHu, which is intended as the “Goldilocks” middle solution
- Colorimeters-based solutions which are pricey and can be intimidating
For more about the wonderful world of color, be sure to check out the rest of our blog – and follow us on our socials to stay up to date!